Quantcast
Channel: dymodev – DYMO Developer SDK Support Blog
Viewing all 23 articles
Browse latest View live

Announcing DYMO Label 8.2.3 SDK Beta Release

$
0
0

Update: DYMO Label software 8.3 has been released. See http://developers.dymo.com/2011/01/13/announcing-dymo-label-8-3/

Update 2: DYMO Label SDK 8.3.1 has been released. See http://developers.dymo.com/2011/12/02/announcing-dymo-label-sdk-8-3-1/

Please Note

This release is a BETA. It has not been extensively tested outside DYMO and should be used for developer testing only, NOT for production software releases.

What’s New

64-bit Support

Now you can use the SDK from 64-bit processes, e.g. Internet Explorer 64-bit. The only thing to do is to recompile your application to be 64-bit, no need to change any code.

New DYMO Label Framework API

Starting this introduces a new API – the DYMO Label Framework. It provides a simpler streamlined interface for printing labels.

Major Features

  • Support for 32-bit and 64-bit applications.
  • Support for Tape printers. Now you can use the same simple API to print on Tape printers as for printing on LabelWriter printers. All you need to do is to design a Tape label in DLS, load it in your application and print.
  • Native .NET support. The Framework provides native .NET support. There is no need to use COM-Interop anymore. Features available in .NET such as indexed properties, enumerators, etc are used to provide an API that is easier to use.
  • COM support. Microsoft COM is supported as well, similar to current SDK.
  • Consolidated High and Low Level API. The Framework combines the current high-level and low-level APIs into a single API. Now there is no need to switch between APIs if you need some advanced functionality not available in high-level API.
  • Cross-browser and cross-platform JavaScript library – see below.

DYMO Label Framework JavaScript Library

To simplify using DYMO Label SDK from web-based application we created a JavaScript library that abstracts browser and platform details for accessing DLS SDK from JavaScript. Now you can use the same JavaScript code to add printing support for any browser the SDK supports. Currently supported browsers are:

  • On Windows: Internet Explorer 6+, Firefox 2+, Chrome 4, Opera 10, Safari
  • On Mac: Safari 3+

Major Features

  • Simple cross-browser and cross-platform API
  • Ability to load and print a label from: a web server, the local file system, or construct on the fly in JavaScript
  • Ability to load images from the server or from local file system
  • Ability to print multiple labels at once

Samples are available on “DYMO Label Framework/Samples/JavaScript” subfolder of the root SDK installation folder. Extensive documentation is provided at the top of the DYMO.Label.Framework.js file.

SDK Installation

The SDK libraries are installed by the DYMO Label 8.2.3 installer. It installs BOTH the DLS SDK (32 and 64 bit) and the new DYMO Label Framework along with drivers and the DYMO Label application.

Windows DYMO Label v.8 Installer

http://www.labelwriter.com/software/dls/win/DLS8Setup.8.2.3.1026-BETA.exe

http://download.dymo.com/download/Win/DLS8Setup.8.3.1.1332.exe

SDK Installer (Documentation and Samples)

http://www.labelwriter.com/software/dls/win/DYMO_Label_v.8_SDK_Installer.8.2.3.123-BETA.exe

http://www.labelwriter.com/software/dls/win/DYMO_Label_v.8_SDK_Installer.exe


How to set data on your label using the SDK

$
0
0

A common question after reviewing the SDK sample applications installed with the SDK installer is “how can I set my own specific data onto the label in a format and layout of my choosing?” To do this you create a label using DLS 8. You can add label objects (Address, Text, Barcode, Image, etc.) onto the label and save it as a ‘template’ for your SDK code to use.

Scenario 1: Adding a TEXT object

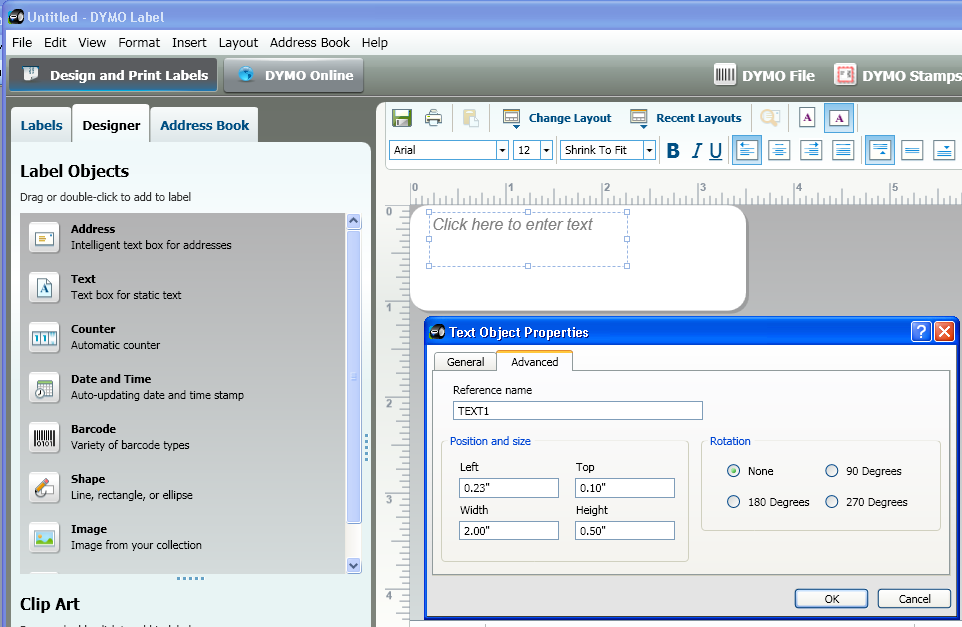
First, run DLS 8 and design a label. Go to the Designer tab and edit the label. For this example, add a TEXT object by double-clicking on ‘Text’. You should now have a resizable rectangle on your label (see screen shot below).

Next, double-click on the rectangle to set the text object properties. Select the Advanced tab from the resulting dialog box. In the edit control titled ‘Reference name’ choose a unique name for this object (see screen shot below).

In this sample, I chose to name the object ‘TEXT1’. Your SDK code sets data on this object using this unique name. For instance,

Framework SDK (sample written in VB.NET)

Private Label As DYMO.Label.Framework.ILabel
Label = DYMO.Label.Framework.Framework.Open("c:Documents and SettingsAll 
UsersDocumentsDYMO LabelLabel FilesTestLabel.label")
Label.SetObjectText("TEXT1", "Testing, testing")
Label.Print("DYMO LabelWriter 450 Turbo")

DLS SDK API (sample written in C#)

myDymoAddin = new DymoAddIn();
myLabel = new DymoLabels();
if (myDymoAddin.Open(@"c:Documents and SettingsAll UsersDocumentsDYMO 
LabelLabel FilesTestLabel.label"))
{
    myLabel.SetField("TEXT1", "Testing, testing");
    myDymoAddin.StartPrintJob();
    myDymoAddin.Print(1, FALSE);
    myDymoAddin.EndPrintJob();
}

Output:

This sets the text, “Testing, testing”, onto the TEXT object which you named TEXT1 on your label. The exact same process would work for creating an ADDRESS object or a BARCODE object. You would simply refer to any other object you create by the name assigned in the Properties dialog (“TEXT1″ in our example) and change the corresponding line of code which sets the data onto this object. For example, if I had added a barcode object and assinged it the name ‘MYBARCODE’, my call to set the data for this barcode object might resemble the following:

myLabel.SetField("MYBARCODE", "97820315");

See Scenario 2 (below) for greater detail about adding a barcode object.

Scenario 2: Adding a BARCODE object

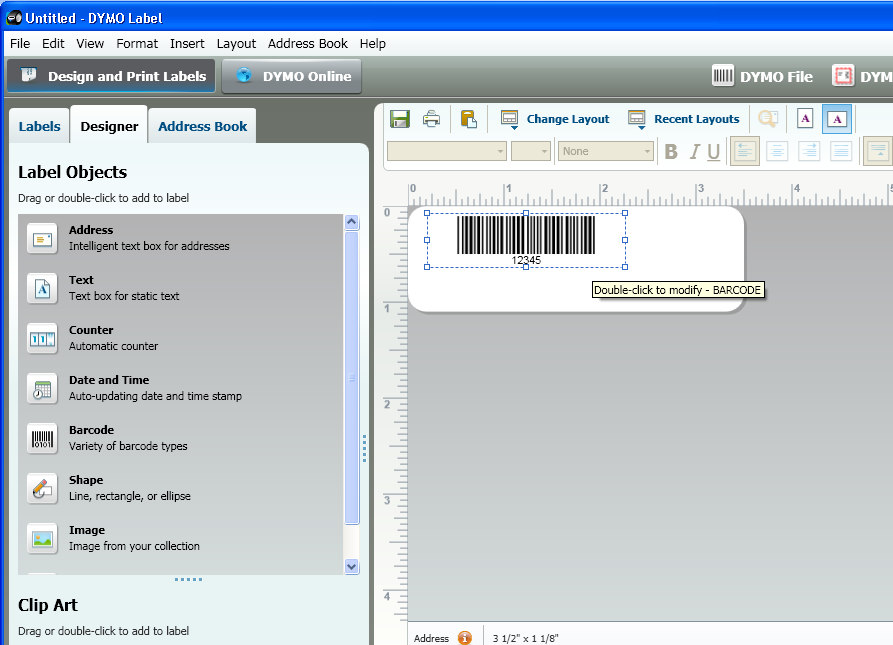
If instead, you would like to add a barcode object (either in addition to the TEXT object from Scenario 1 or all by itself), again, run DLS 8 to add this object to your label file template. Go to the Designer tab and edit the label. Add a BARCODE object by double-clicking on ‘Barcode’. You now have a resizable rectangle on your label (see screen shot below).

When you size the barcode object make sure its large enough to hold the barcode for your data! Next, double-click on the rectangle to set the barcode object properties. Select the Advanced tab from the resulting dialog box. In the edit control titled ‘Reference name’ choose a unique name for this object (see screen shot below).

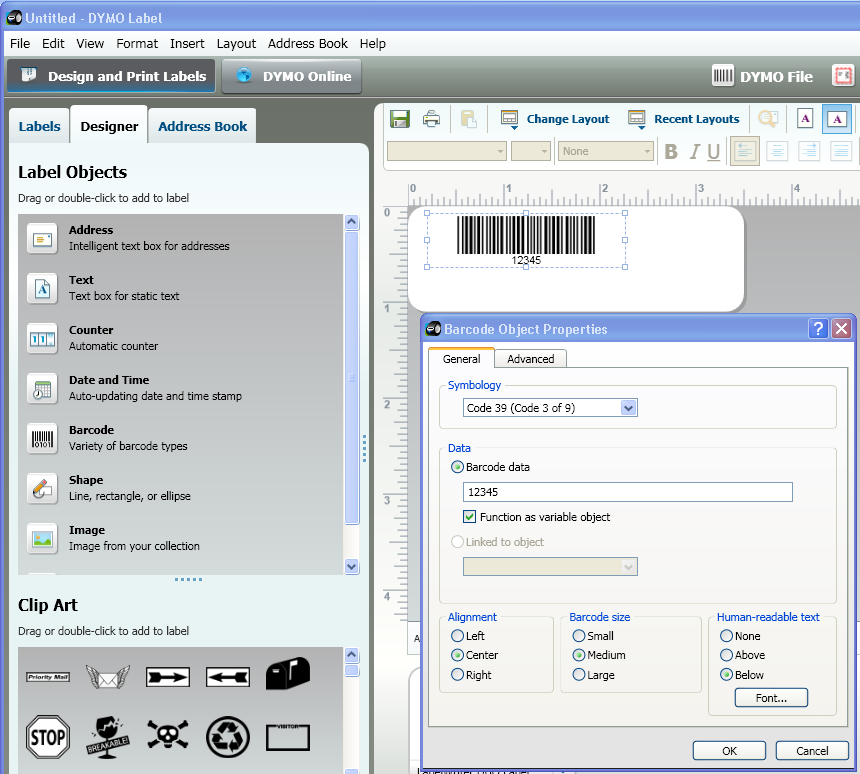
In this sample, I chose to name the control ‘TEST_BARCODE’. Your SDK code sets data on this object using this unique name.  Next, click on the ‘General’ tab of the properties dialog box. You are now presented with options to change the barcode symbology (see screen shot below).

The code sample below will set the barcode data to ‘9876543’ for the particular label printed.

Framework SDK (sample written in VB.NET)

Private Label As DYMO.Label.Framework.ILabel
Label = DYMO.Label.Framework.Framework.Open("c:Documents and SettingsAll 
UsersDocumentsDYMO LabelLabel FilesTestLabel.label")
Label.SetObjectText("TEST_BARCODE", "9876543")
Label.Print("DYMO LabelWriter 450 Turbo")

DLS SDK API (sample written in C#)

myDymoAddin = new DymoAddIn();
myLabel = new DymoLabels();
if (myDymoAddin.Open(@"c:Documents and SettingsAll UsersDocumentsDYMO 
LabelLabel FilesTestLabel.label"))
{
    myLabel.SetField("TEST_BARCODE", "9876543");
    myDymoAddin.StartPrintJob();
    myDymoAddin.Print(1, FALSE);
    myDymoAddin.EndPrintJob();
}

Output:

Conclusion

The format of the label (objects found within the label and their locations) printed from your SDK application can easily be edited using DLS 8. The data passed to the objects is controlled through the SDK application itself. Using the SetField() functionality you can set your desired data into the formatted label template with total control.

Integrating DYMO LabelWriter Printers into Salesforce.com

$
0
0

This post guides you through the simple steps needed to add your DYMO LabelWriter printer(s) to the Salesforce.com environment so that you can print a contact’s mailing address on a DYMO address label.

The post assumes that you are familiar with Salesforce.com’s CRM software and have a developer account with the company. Consult Salesforce.com user documentation if you have never created a Visualforce page.

The major tasks are:

  • Download and install the appropriate DYMO Label software and SDK
  • Create the Visualforce page that enables you to:
    • · Enumerate a list of client-side printer names
    • · Generate and preview an image for the label
    • · Create an editable multi-line text box with the mailing address for a selected contact
    • · Print the label
    • · Create a Print Label button

When these tasks are completed, your Salesforce.com page will resemble the following example:

pic01

Introduction

Salesforce.com is a Web-based service. As such, Salesforce.com stores and manipulates data on the server side without the need to know much about the client side – your computer. The Salesforce.com server has no knowledge of the peripherals that are connected to your computer. The DYMO Label Framework JavaScript Library fills the gap between your Salesforce.com data and your DYMO LabelWriter printer.

Salesforce.com may be customized for individual customer needs. This post provides JavaScript code examples and describes the Visualforce customization that is required for the CRM software- LabelWriter printer integration.

Download and Install DYMO Label Software

You need to download and install the following software:

DYMO Label v.8.3 (DLS). The latest updates are available for Windows and Mac

· Windows DYMO Label v.8.3 Installer

· Mac DYMO Label v.8.3 Installer

DYMO Label Framework JavaScript library which supports the most popular browsers for Windows and Mac

· DYMO Label Framework JavaScript Library

Creating the Visualforce Page

This post uses the standard Visualforce controller extension to provide access to a current contact’s data. To work with an existing contact’s data, you must specify the contact’s ID in the URL as an input parameter.

To begin, you have to:

  1. Pick one of your contacts (using the Contacts tab).
  2. Create a new URL that enables you to create a new Visualforce page.
  3. Type a page name in the URL, specifying the contact’s ID as an input parameter.

With Salesforce.com running, go to a contact’s Detail page and copy the ID from the browser’s address bar. The following screenshot shows the contact ID for Mr. Sean Forbes.

pic02

Paste the ID into your new URL. The new page URL will resemble the following:

https://c.na5.visual.force.com/apex/PrintAddress?id=0037000000TG8xR’

where PrintAddress is the name of your Visualforce page.

After this URL is typed into the browser’s address bar, the system displays the message:

Page PrintAddress does not exist

To create a page, click the Create Page link beneath this message.

An empty page is created and you can begin to construct the Visualforce page elements described in this post.

Specifying the Controller Extension and Linking the DYMO Label Framework JavaScript Library

Begin by specifying the controller extension and linking the page with the DYMO Label Framework JavaScript Library. Here is the code that does this:

<apex:page id="printAddressPage" standardController="Contact" extensions="PrintAddressExtension">
    <apex:includeScript value="{!$Resource.DymoFramework}"/>
    
    <div style="padding-bottom:6px">
        <apex:outputLink value="{!URLFOR($Action.Contact.View, $CurrentPage.parameters.id)}">
            Back to {!paObject.Contact.FirstName} {!paObject.Contact.LastName} detail page
        </apex:outputLink>
    </div>
    
    <apex:form >
    </apex:form>

</apex:page>

Before including the library in your page, you must add the DYMO Label Framework JavaScript Library as a static resource. Here are the steps:

  1. Create the resource by selecting App Setup > Develop > Static Resource from Salesforce.com.
  2. Provide a name, for example: DymoFramework.
  3. Browse to the folder where the DYMO Label SDK is installed (or where DYMO Framework JavaScript library is downloaded).
  4. Select the DYMO.Label.Framework.js file.

Now the framework library can be referenced on the page as:

<apex:includeScript value="{!$Resource.DymoFramework}"/>

The next part of the code is used as a page controller. You create a singleton:

paObject

to get access to the current contact’s properties as well as to accommodate other methods that the Visualforce page may require.

public class PrintAddressExtension
{
    public PrintAddressExtension(ApexPages.StandardController controller)
    {
    }

    public class PaObject
    {
        private Contact m_contact;
        public PaObject()
        {
            Id id = System.currentPageReference().getParameters().get('id');
            
            m_contact = id == null ? new Contact() :
                [Select Id, FirstName, LastName, MailingStreet, MailingCity, MailingState, MailingCountry,
                   MailingPostalCode FROM Contact WHERE Id = :id];
           
        }
        
        public Contact getContact()
        {
            return m_contact;
        }
        
        // contact full name
        public String getContactFullName()
        {
            if (m_contact == null)
            {
                system.Debug(logginglevel.ERROR, 'PaObject.m_contact is null');
                return '';
            }
            
            return m_contact.LastName + ', ' + m_contact.FirstName;
        }       
    }

    private paObject m_paObject;
   
    public PaObject getPaObject()
    {
        if (m_paObject == null)
        {
            m_paObject = new PaObject();
            System.debug(logginglevel.INFO, 'singleton PaObject is created');
        }
        return m_paObject;
    }
}

Save the Visualforce page and controller.

The system displays a page with a link:

Back to <Contact> detail page.

Enumerating Printer Names

As mentioned previously, the Salesforce.com server does not know what peripherals are connected to your computer. You must generate a list of the printer names separately on the client side and provide this information to Salesforce.com. You do this by coding a JavaScript routine that enumerates the available printers.

The Visualforce page contains an <apex:selectList> control (selection drop-down combo-box). You leave this control empty when the Visualforce page is first created. The control is created in such a way that you can add items to it later. You will have a global variable, <apex:selectList>, reference to this control.

Here is the piece of code that shows all these elements:

    <apex:form >
    
        <apex:pageBlock id="PrintersBlock" title="Select Printer">
            <apex:selectList id="Printers" size="1" />
        </apex:pageBlock>
    
        <script>
            var PrintersCtrl = document.getElementById("{!$Component.PrintersBlock.Printers}");
        </script>
    </apex:form>

To get access to the generated HTML element, you declare a PrintersCtrl variable and reference it using the full path of nested page blocks. The Salesforce.com syntax is:

{!$Component.PrintersBlock.Printers}

The JavaScript code shown below populates the list. The code uses the onload page event to hook to the procedure of enumerating LabelWriter printers. The enumPrinters function returns a list of available printers. From this function, you call the DYMO Label Framework JavaScript Library method declared as getPrinters(). You reference this method by the namespaces declared in the Library.

dymo.label.framework.getPrinters();

The method returns a list of the names of all available DYMO label printers installed on the client. Since you are going to print an address label, you can only use LabelWriter printers because these printers use die-cut address labels.

The DYMO Label Framework JavaScript Library returns the complete list of printers. You must iterate through the list again and dynamically create OPTION elements filled with only the LabelWriter printer names.

At this point, the reference to the HTML-rendered control becomes handy because you can access to the element (PrintersCtrl ) from JavaScript as:

PrintersCtrl.options.add(option);

Now, find the </apex:form> tag in the previous code example, and add the following code below the tag.

<script type="text/javascript">

    function enumPrinters() {
        var plist = new Array();
        var printers = dymo.label.framework.getPrinters();
        if (printers.length == 0) {
            alert("No DYMO printers are installed. Install DYMO printers.");
        }
        else {
            for (var i = 0; i < printers.length; i++) {
                if (printers[i].printerType == "LabelWriterPrinter")
                    plist[i] = printers[i].name;
            }
        }
        return plist;
    }

    window.onload = new function () {
        var plist = enumPrinters();

        if (plist.length > 0) {
            // populate combo-box control with a list of printers

            for (var i = 0; i < plist.length; i++) {
                var option = document.createElement("OPTION");
                option.text = plist[i];
                option.value = plist[i];
                PrintersCtrl.options.add(option);
            }
        }
    }
</script>

The Salesforce.com page now includes a SELECT control that is populated with the names of DYMO LabelWriter printers.

Updating the Label Preview

Next, you generate an image for the label preview. Some of the work, such as rendering the actual image, needs to be done on the client since only the DYMO Label Framework knows how to do this. The idea is that prior to submitting the page for a redraw, the client side needs to generate an image and save the result in the Visualforce page’s hidden field. When the Visualforce page is redrawn, it will contain the updated image taken from the controller’s member associated with the hidden field. To implement this approach, you introduce other Visualforce UI elements and global variables. Here is the code for this work:

<apex:form>
    <apex:inputhidden id="PreviewImageSrc" value="{!paObject.imageSrc}"/>
  
     <apex:pageBlock id="EditorBlock" title="{!paObject.contactFullName}">
        <div>
            <apex:inputTextarea id="AddressEditor"
                         value="{!paObject.formattedAddress}" rows="4" cols="52"/>
        </div>
        <div>
            <apex:inputCheckbox id="BarcodeCheckbox" selected="{!paObject.printBarcode}"
             	style="vertical-align:middle"/> Print Intelligent Mail Barcode
        </div>
        
        <hr/>
        
        <apex:commandButton id="ButtonUpdate" value="Update" rerender="PreviewPanel"          
        	     onclick="updatePreview('{!paObject.addressLabelXml}')"/>

    </apex:pageBlock>

    <apex:pageBlock id="PrintersBlock" title="Select Printer">
        <apex:selectList id="Printers" size="1" />
    </apex:pageBlock>

    <script>
        var PrintersCtrl = document.getElementById("{!$Component.PrintersBlock.Printers}");
        var AddressEditor = document.getElementById("{!$Component.EditorBlock.AddressEditor}");
        var BarcodeCheckbox = document.getElementById("{!$Component.EditorBlock.BarcodeCheckbox}");
        var PreviewImageSrc = document.getElementById("{!$Component.PreviewImageSrc}");
        var ButtonUpdate = document.getElementById("{!$Component.EditorBlock.ButtonUpdate}");
    </script>  
</apex:form>

<apex:outputpanel id="PreviewPanel">
    <div>
        <apex:image id="previewImage" url="{!paObject.imageSrc}"/>
    </div>   
</apex:outputpanel>

The added UI controls are:

  • A multi-line text editor for modifying the address (if desired).
  • A checkbox that triggers the inclusion of the Intelligent Mail Barcode on the label.
  • An Update button.

The Update button contains the rerender="PreviewPanel" attribute, which refreshes only the preview part of the page. When the Update button is clicked, only <apex:outputpanel> within the Visualforce page is redrawn. (See the Salesforce.com ’s user documentation for more information regarding the partial page refresh.)

Another element this code creates is a hidden field that stores the image preview’s raw data between the time when the update action is invoked and the time when the preview panel is redrawn. The code also contains a reference to the Update button itself because an update action must be invoked when the page is loaded for the first time.

The code hooks to the updatePreview JavaScript function when the Update button is clicked. Similar to the enumPrinters function, this updatePreview JavaScript function calls the DYMO Label Framework Library to open a label template and set the address data in the template’s address object. If you need to make additional modification to the label’s appearance—because of a user request or the data itself—it can be done in this updatePreview function.

In the example shown below, the code prevents the address barcode from appearing in the address.

    function updatePreview(template) {
        try {
            var address = AddressEditor.value;
            var label = dymo.label.framework.openLabelXml(template);

            label.setAddressText(0, address);

            // barcode - show it or not
            if (!BarcodeCheckbox.checked)
                label.setAddressBarcodePosition(0, dymo.label.framework.AddressBarcodePosition.Suppress);

            var pngData = label.render();
            PreviewImageSrc.value = "data:image/png;base64," + pngData;
        }
        catch (e) {
            alert(e.message);
        }
    }

The updatePreview function takes one parameter: an xml string that represents the label template. For simplicity, the example includes the xml template definition as a read-only property in the controller. Alternately, this string could be a static resource.

The call to the DYMO Label Framework Library’s label.render() method returns an image’s raw data as a string. The code assigns this string to the hidden text field (accessible as PreviewImageSrc).

An important thing to remember is that the Visualforce <apex:inputhidden> element requires a corresponding property in the controller. The controller should have a string property called imageSrc.

When the Update button is clicked, the updatePreview function:

  • Gathers all the data from the page controls.
  • Generates the label’s image.
  • Saves the image in the hidden field associated with the controller’s property.
  • Submits a request to redraw part of the page.

When the page is rendered, the Visualforce control <apex:image url="{!paObject.imageSrc}"/> contains an updated image.

To have a preview shown when the page is loaded for the first time, you have to add the next line into the page initialization routine:

ButtonUpdate.click();

Printing the Label

The Visualforce page requires a Print button that is linked to a corresponding JavaScript function attached to an onclick event. The printing function is not much different from the updating the preview function. However, instead of getting the label preview from the label.render() method, the function invokes label.print to print at the desired printer.

Here is the JavaScript print function code:

    function printAddress(template) {
        try {

            var label = dymo.label.framework.openLabelXml(template);
            label.setAddressText(0, AddressEditor.value);

            if (!BarcodeCheckbox.checked)
                label.setAddressBarcodePosition(0, dymo.label.framework.AddressBarcodePosition.Suppress);

            var printer = PrintersCtrl.value;

            label.print(printer);
        }
        catch (e) {
            alert(e.message);
        }
    }

Creating a Print Label Button

Here is the link to the code examples:

http://www.labelwriter.com/software/dls/sdk/blog_resources/Salesforce.PrintAddress.zip

To make them work, you must add a custom button to the contact’s Detail page.

  1. Select Setup > Customize > Contacts > Buttons and Links.
  2. Click the New button in the Custom Buttons and Links section.

A page similar to the following example appears.

pic03

  1. Provide the requested parameters.
    • · Button Label and Name
    • · Description
    • · Display Type (the type of UI link or button)
    • · Behavior (select Display in existing window with sidebar)
    • · Content Source (select Visualforce Page)

When you have completed and saved this customization work, a Print Label button appears on the Detail page for each of your contacts.

Conclusion

That is all there is to it. I hope this post has demonstrated how easy it is to integrate DYMO LabelWriter printers into a Salesforce.com application.

LabelWriter 450 and 450 Turbo USB Connection Issues

$
0
0

Some LabelWriter 450 and 450 Turbo label printers manufactured after April 1, 2014 will not install properly on computers running Windows 7 when connected through a USB 3.0 port. DYMO has a software update available that will fix this problem. For assistance, check here to determine if your label printer is affected and to install the software update. You can also call DYMO Customer Support at 1 (877) 724-8324, Monday-Friday, 8 am – 6 pm (EST).

DYMO Label Framework and Chrome

$
0
0

A some may be already aware of, Google has announced that it will phase out support for NPAPI in Chrome with the ultimate removal in Sept 2015.   We use NPAPI in the framework for plugin support for most browsers except for IE which we use an ActiveX plugin.  We are investigating alternatives to NPAPI but we have not come up with a solution yet.

In the mean time before Sept 2015, you will have to possibly change several settings in your Chrome browser in order to use the DYMO Label Framework:

  1. Click on the Chrome Customize button in the upper right of your browser
  2. Find the Settings option
  3. Click on the “Show Advanced Options” link
  4. Click on the “Content Settings” button or browse to chrome://settings/content
  5. Verify that “Allow all sites to run JavaScript” is enabled
  6. Verify that under Plug-ins that “Run Automatically” is selected
    1. You can check in the “Plug-in exceptions” to see if the site you are running the Framework from is set to “Allow” instead of “Block”
  7. Verify that “Unsandboxed plug-in access” is not set to “Do not allow any sites….”

ChromeSettings


This should get things working.

Another work around, though less than ideal is to use the extension IE Tab.  This will put a web page into an IE browser tab within Chrome and will use the ActiveX plugin instead of the NPAPI version.  It has options to add a wild card URL that will automatically use the IE Tab when it matches.  We recognize that this is not a valid long term solution.

Update (4/15/2015)
With version 42 of Chrome, Google now disables NPAPI which is required to run our plugin. However, you can manually enable it by typing the following into the Chrome address bar and adjusting the setting:
chrome://flags/#enable-npapi

Update (4/20/2015)
It has been our experience that just enabling NPAPI may not be enough. In some instances, close the chrome browser then uninstall and re-install the DLS software for the plugin to appear in the plugin list: chrome://plugins/
Go here to see if your browser has the framework installed correctly: Check Environement

Update (5/8/2015)
In some situations, a full shutdown and reboot is required after all the steps have been performed for the plugin to appear in Chrome.

Attention JavaScript SDK users!

$
0
0

As many of you know, Google is removing support for NPAPI in the Chrome browser. Our existing JavaScript SDK utilizes this API. We have been diligently working on a new communication mechanism that will work on all browsers and will avoid such things as NPAPI and Active-X and will decouple the SDK from browser specific implementations.

The good news is that we are currently testing our new communication protocol and it will be ready for a Beta release soon.

We have worked hard to make sure that the new SDK will be backwards compatible. There will be the addition of an initialization method, but the existing API works the same.

Our new SDK will utilize TCP/IP to communicate between the browser and a Windows service running on the client machine. The new service will be installed with DLS when upgrading to the new version. A range of ports will be available for our windows service, if the browser cannot bind to one of the ports, it will fall back to our legacy plug-in architecture. For additional security, the service will accept connections only from localhost.
Stay tuned to this blog for more information.

DYMO Label Framework JavaScript Library 2.0 Open Beta!

$
0
0

We are proud to announce the Open Beta of the new DYMO Label Framework JavaScript Library 2.0. This solution uses a new communication mechanism that will work on all browsers. This means that we have removed the dependency of browser specific plugins like NPAPI and Active-X. The current DYMO Label Framework API is fully supported.

Requirements

The new init method

Since the new communication protocol needs to discover the port that the DYMO service is listening on, a new method was introduced, dymo.label.framework.init(callback). This method performs a scan of a range of ports to look for the DYMO service. This method needs to finish before any other DYMO Framework API calls are made. To accomplish this, the method takes a callback method that will be called as soon as the dymo.label.framework.init method finishes.

Backward Compatibility Mode

If the dymo.label.framework.init method is not called (i.e. no user code has been changed) then the Framework goes into backward compatibility mode. It will try to scan the first port in the defined range and if it finds the service, the new communication protocol will be used. If it fails, it will fall back to the previous implementation that uses native plugins (NPAPI/Active-X).

Init Example

Typical startup code where a method is subscribed to an onload event:

function startupCode() {
    /* access DYMO Label Framework Library */
}
window.onload = startupCode;

The code should be changed to call a shim that will initialize the DYMO Framework before calling the rest of the startup code.

function startupCode() {
    /* access DYMO Label Framework Library */
}
function frameworkInitShim() {
    dymo.label.framework.init(startupCode); //init, then invoke a callback
}
window.onload = frameworkInitShim;

Tracing

We have added a new tracing feature. This can be used to help debug issues with the new service. The property is called dymo.label.framework.trace. When set to true, it will put tracing messages in the browser developer console. You should set the trace property before calling the dymo.label.framework.init method:

Tracing Example

dymo.label.framework.trace = 1; //true
dymo.label.framework.init(startupCode);

Known Limitations

  • The port number that the service binds to is not user definable. We tried to use a range of ports that are not typically used but there could be port conflicts.
  • HTTPS: Because the service currently uses insecure (http) requests, some browsers may have some issues. For example, Firefox will block insecure XHR requests when a page is loaded through HTTPS. So in order to enable it, the user has to click icon in the address bar and enable insecure requests within a secure connection.
  • As stated in the requirements, a Microsoft patch is typically required on Windows 8 and greater.
  • MacOSX support is not included in this Beta, we are working on it now and we will post more news about this version soon.
  • As with DLS, we do not support Windows Server configurations.

To Do

  • A new version of the DYMO Label Software 8.5.2 will become available. This version will include the new Framework implementation and will be considered the Release version of the new Framework. This is expected to be released near the end of September.
  • Service Configuration (Port Number): Currently, the service will bind to the first available port within a given range. We will add a parameter that will allow a user to assign a particular port within the given range.
  • Investigate the best way to work over HTTPS without issues
  • We are implementing asynchronous versions of existing API methods
  • Take constructive feedback and bug reports from our Beta Customers. We will be releasing new versions of the Beta as we respond to issues found in the field.

Update 08/28/2015

If the Web Service fails to install, try and turn off your Anti-virus software before installing.


Update 09/09/2015

We apologize for the delay of the next version of the Beta.  We’ve have been working on full HTTPS support, for which testing is ongoing, we found some issues and want to fix them before releasing.  We’ve also reproduced the service not recognizing networked printers.  We are investigating the possible solutions since it appears to be a limitation of what the service has access to.  We’ll keep you informed of any developments.

DYMO Label Framework JavaScript Library 2.0 Open Beta 2!

$
0
0

We apologize for the length of the delay in this release but we ran into a number of unforeseen issues trying to fix a couple of the bigger issues that were brought to our attention. The two issues that we are addressing in this release are problems with HTTPS and Network Printer discovery.

Requirements

Network Printers

This was a big issue. A service running on windows will not see Network/shared printers for a user and there are Microsoft bugs that prevent seeing these printers when the service is run as the current user. With that in mind, we had to re-implement the way the service is run. It is now a service that starts when the user logs in. This Service will appear in a user’s application tray and can be configured from there. This will allow the SDK to see any Network/Shared Printers that the user has installed.

HTTPS

Our JavaScript library now connects to the web service via HTTPS. We have to install a self-signed certificate to allow this to happen. After installation finishes, we will ask the user if they want to open up the default browser to accept the certificate. Once the certificate is accepted then all HTTPS traffic should work as normal. You can install the certificate on other browsers by going to “https://localhost:/DYMO/DLS/Printing/Check”. This is important for the Firefox broswer.

New Tray application

The new tray tool has several options:

  • Start/Stop the Service
  • Configure: Which will let you specifically configure a port within the approved range.
  • Diagnose: This will confirm that the service is running and identify the port.

Notes

  • The KB2954953 patch no longers needs to be applied for the service to work
  • We’ve seen some issues where the service needs to run with elevated permissions to see the printers. We are working on this issue.
  • We’ve seen some crashes when the service starts or at the end of the install. We are investigating but you should be able to start the service from the C:\Program Files (x86)\DYMO\DLS Web Service\DYMO.DLS.Printing.Host.exe
  • The Mac version is being tested right now and we hope to have a version released soon.

We appreciate your patience! We are working on this as hard as we can and understand your frustrations with delays. We want to insure that we release a quality product that can meet your demands. Your feedback is valuable to us!


DYMO Label software version 8.5.3 for Windows

$
0
0

We are proud to announce the release of DYMO Label software version 8.5.3 for Windows.

This release includes:

  • Support for Microsoft Windows 10
  • Support for Microsoft Office 2016
  • DYMO Label Web Service is installed for use by the DYMO Label Framework.

You can now download: DYMO Label software 8.5.3
You can also download the Javascript Library : DYMO Label Framework 2.0

Reference the following posts for additional set up information.  Keep in mind that the Web Service is build into this version of DYMO Label so the standalone install is no longer required.

We also know that you are interested in the Mac version.  We have had a lot of issues getting the design to work on Mac OSX, we have hit a major milestone this week and we now have a release candidate for DLS 8.5.3 for the Mac.  If everything passes, we should be able to release it within a work week.

As a note to all our patient customers, we really appreciate you and your patience.  This has been a more difficult release than we had thought but it is finally happening.  All we have now is the imminent MacOSX release.   Thank you!

Update: Added link to new Javascript library version and added links to older posts for references

DYMO Label software version 8.5.3 for Mac

$
0
0

We are proud to announce the release of DYMO Label software version 8.5.3 for Mac.

This release includes:

  • Support for OS X El Capitan
  • Support for Microsoft Office 2016
  • DYMO Label Web Service is installed for use by the DYMO Label Framework.

You can now download: DYMO Label software 8.5.3
You can also download the JavaScript Library : DYMO Label Framework 2.0

The JavaScript library is the same as the one posted in the DLS Windows release so the information in the following posts apply to the Mac version of the SDK. Keep in mind that the Web Service is built into this version.

Thanks again for everyone’s patience.  We were not able to do a Beta on the Mac version but it contains all the feedback that we got from the Windows Beta.  If there are any issues, please either post on the blog or send an email to sdkreply at newellco dot com.  We’ll be monitoring both looking for issues and will try to respond to issues as quickly as possible.  Keep in mind the more information that you include in your post/email, the better we will be able to help you.

It should be noted that the JavaScript Samples that are in older posts on the blog have not been updated to incorporate the web service correctly.

 UPDATE

We’ve had some reports from our users that a reboot may be required for the DYMO Web Service to get properly configured.  We are looking into this further.  The way you know you are in a state that requires a reboot is as follows:

  1. Click on the DYMO icon in the upper right on the top menu bar
  2. Select Diagnose
  3. If a dialog pops up and it complains about no ssl assigned to the port, you should reboot.
  4. If you see a dialog that says “DYMO Label Web Service is running on port XXX”, then there could be a different issue.


DYMO Label software version 8.5.3 for Patch Release Mac/Win

$
0
0

I hope everyone enjoyed their holidays!  We have had a number of issues reported, several of them were big enough that we decided to release an 8.5.3 patch version that fixes the issues that were found.

Issues Fixed:

  • Win: There were instances that caused Barcode corruption when the Barcode was rotated on a label
  • Mac: There were issues with with the Web Service refreshing the list of DYMO printers
  • Mac: Web Service method timeout is increased due to too many timeouts
  • JS: Fixed issues with Async calls
  • JS: Fixed Issue that isBroswerSupported return the wrong value
  • JS: Fix Issue with a Crash when running in IE8

Reference the following posts for additional set up information.  Keep in mind that the Web Service is built into this version of DYMO Label so the standalone install is no longer required.

Downloads:

Thanks for all the great feedback!  Let us know of any issues found, we’ll continue to give the best support we can.

Update: Fixed a typo that was referencing the wrong revision number for the Windows build

Printing QR-code: Part 2

$
0
0

The previous post demonstrated different ways of printing QR-code from a .NET application. This blog post will demonstrate how to achieve the same goal from a web application. The complete sample is available here. The corresponding JavaScript is here.

Prerequisites

First, make sure the latest DYMO Label software is installed. It is always available on DYMO web-site, at the time of writing it is version 8.3.1.

Use Barcode Object

The easiest way to print QR-code is to use built-in support for QR-code in DYMO Label Framework. First, design your label using DYMO Label software. Unfortunately, DYMO Label itself does not have ability to specify QR-code barcode type in the UI yet. So, add the Barcode object to the label and put it into desired position. Don’t specify the barcode symbology, use the default Code39. Save the label in to a file, open the file in any XML editor and change thetag to “QRCode”.

<BarcodeObject>
    <Name>Barcode</Name>
    <ForeColor Alpha="255" Red="0" Green="0" Blue="0" />
    <BackColor Alpha="0" Red="255" Green="255" Blue="255" />
    <LinkedObjectName></LinkedObjectName>
    <Rotation>Rotation0</Rotation>
    <IsMirrored>False</IsMirrored>
    <IsVariable>False</IsVariable>
    <Text></Text>
   <Type>QRCode</Type>
    <Size>Large</Size>
    <TextPosition>None</TextPosition>
    <TextFont Family="Arial" Size="8" Bold="False" Italic="False" Underline="False" Strikeout="False" />
    <CheckSumFont Family="Arial" Size="8" Bold="False" Italic="False" Underline="False" Strikeout="False" />
    <TextEmbedding>None</TextEmbedding>
    <ECLevel>0</ECLevel>
    <HorizontalAlignment>Left</HorizontalAlignment>
    <QuietZonesPadding Left="0" Top="0" Right="0" Bottom="0" />
</BarcodeObject>

See Barcode.label from the sample. After the label is ready, the actual steps to print it is quite easy: open the label, set desired data, print. Here is a snippet from the sample:

printButton.onclick = function()
{
    try
    {
        if (!barcodeLabel)
            throw "Load label before printing";

        if (!printersSelect.value)
            throw "Select printer.";

        barcodeLabel.setObjectText('Barcode', 'http://developers.dymo.com');
        barcodeLabel.print(printersSelect.value);
    }
    catch(e)
    {
        alert(e.message || e);
    }
}

First, we check that the label is loaded and the printer is selected. Next, the barcode data is set to be the blog’s URL. And finally, the label is printed.

Use Image Object

Printing QR-code by using Barcode object is easy. The only drawback, it is hard to control the actual barcode size. tag can be used for that but it support only three predefined sizes Small/Medium/Large, but still the overall size will depend on the actual barcode data. The longer the data string, the larger is the barcode. So, the idea is to use some library to generate QR-code image of desired size, and then print it using the Image object. As before, design a label using DYMO Label software. Put an Image object on the label where the barcode should be printed. Set the Image objet size to the desired barcode size. When specifying the barcode image size in pixels calculate it based on the printer resolution, that is 300 dpi for LabelWriter printers and 180 dpi for Tape printers. For example, if you want the barcode to be 1” in size, specify the barcode image size as 300×300 pixels. See BarcodeAsImage.label from the sample project.

Image object accepts image data as a string that contains base64-encoded png stream. The question is, how to get/generate this string. Again, there are several ways of doing that.

Generate and base64-encode QR-code image on the server-side

One way is to generate QR-code image on the server using some library. Then encode the image using base64 and return it to the client as a string. Finally, on the client side, call setObjectText on the Image object and print.

printAsImageButton.onclick = function()
{
    try
    {
        if (!barcodeAsImageLabel)
            throw "Load label before printing";

        if (!printersSelect.value)
            throw "Select printer";

        $.get("qr.base64", function(qr)
        {
            try
            {
                barcodeAsImageLabel.setObjectText('Image', qr);

                barcodeAsImageLabel.print(printersSelect.value);
            }
            catch(e)
            {
                alert(e.message || e);
            }
        }, "text");

    }
    catch(e)
    {
        alert(e.message || e);
    }
}

In the sample, we just request “qr.base64” resource that contains precalculated QR-code image for “http://developers.dymo.com”. In real application, you will probably pass the data to be encoded as a resource parameter.

Generate QR-code image on the server-side and base64-encode it on the client-side.

Base64-encoded strings are larger then binary png data. So, to reduce network traffic, we can return original png data from the server and base64-encode it on the client. To encode the data we will create , render our image on it, and then get encoded data using canvas.toDataURL() method.

printAsImageCanvasButton.onclick = function()
{
    try
    {
        if (!barcodeAsImageLabel)
            throw "Load label before printing";

        if (!printersSelect.value)
            throw "Select printer.";

        var img = new Image();
        img.onload = function()
        {
            try
            {
                var canvas = document.createElement('canvas');
                canvas.width = img.width;
                canvas.height = img.height;

                var context = canvas.getContext('2d');
                context.drawImage(img, 0, 0);

                var dataUrl = canvas.toDataURL('image/png');
                var pngBase64 = dataUrl.substr('data:image/png;base64,'.length);

                barcodeAsImageLabel.setObjectText('Image', pngBase64);
                barcodeAsImageLabel.print(printersSelect.value);
            }
            catch(e)
            {
                alert(e.message || e);
            }
        };
        img.onerror = function()
        {
            alert('Unable to load "qr.png"');
        };
        img.src = 'qr.png';
    }
    catch(e)
    {
        alert(e.message || e);
    }
}

Note: image loading is asynchronous process. So, we can’t just assign img.src property and immediately draw it on a canvas; we have to wait until the image is loaded completely from the server. To handle that, we do main work in onload handler. also, toDataURL returns data url, to get the data itself, we have to remove the url prefix.

Again, as in the previous case, qr.png resource contains recalculated QR-code image for “http://developers.dymo.com”. In real application, you will probably pass the data to be encoded as a resource parameter.

A drawback of this method is that it requires support in the browser. All major browsers already support it, but be aware that in Internet Explorer it is supported starting from version 9 only.

Use third-party service

Instead of generating QR-code image on your own server, is it possible to use one of the many free online QR-code generator/service? The answer is yes, but it is even more trickier than the previous way. The problem, as usual in web development, is the security. But default is it not possible to grab canvas pixels if an image from a different domain has been drawn on the canvas. It is possible to overcome it, but it requires three parties to participate properly. First, your JavaScript has to set img.crossOrigin property to ‘anonymous’. This will tell the browser that you are trying to access a cross-domain resource, so the browser can send appropriate request headers, e.g. the browser will not send cookies. Next, the server itself should allow its resources to be accessible from other domains. Only few of many QR-code online generators do allow it. And the last, the browser itself should support CORS for . It is very recent addition to the standards, so at the time of writing only Chrome does support it. In any other browsers you will still get “security exception” error. Here are some links regarding and cross-domain limitations:

http://www.whatwg.org/specs/web-apps/current-work/multipage/the-canvas-element.html#security-with-canvas-elements

http://blog.chromium.org/2011/07/using-cross-domain-images-in-webgl-and.html

http://code.google.com/p/chromium/issues/detail?id=82042

Update (2011-12-20): works in Firefox 9 as well.

printAsImageCanvas2Button.onclick = function()
{
    try
    {
        if (!barcodeAsImageLabel)
            throw "Load label before printing";

        if (!printersSelect.value)
            throw "Select printer.";

        var img = new Image();
        img.crossOrigin = 'anonymous';
        img.onload = function()
        {
            try
            {
                var canvas = document.createElement('canvas');
                canvas.width = img.width;
                canvas.height = img.height;

                var context = canvas.getContext('2d');
                context.drawImage(img, 0, 0);

                var dataUrl = canvas.toDataURL('image/png');
                var pngBase64 = dataUrl.substr('data:image/png;base64,'.length);

                barcodeAsImageLabel.setObjectText('Image', pngBase64);
                barcodeAsImageLabel.print(printersSelect.value);
            }
            catch(e)
            {
                alert(e.message || e);
            }
        };
        img.onerror = function()
        {
            alert('Unable to load qr-code image');
        };
        img.src = 'https://chart.googleapis.com/chart?chs=300x300&cht=qr&chl=http%3A//developers.dymo.com&choe=UTF-8';
    }
    catch(e)
    {
        alert(e.message || e);
    }
}

The code is very similar to the previous example. The only difference is that we set img.crossOrigin property and we use Google’s Infographics API to generate the qr-code image. Notice that in this example the image is generated dynamically, and barcode data is passed as the part of the url.

Pure client-side JavaScript

At the time of writing, it seems there is no self-contained pure JavaScript solutions to create QR-code images using <canvas> completely on the client-side. In the future it might be one more way of doing QR-code printing.

Conclusion

It is quite simple to print QR-code barcode even if built-in support is somewhat limited.

Happy Holidays and Farewell

$
0
0

Happy holidays to all DYMO users and developers! Thank you for being with DYMO, for all the questions, comments, and feedback. It’s invaluable!

2011 was quite a year, with a lot of new releases and new features.

It started with releasing of DYMO Label software 8.3 that added full support for new DYMO Label Framework API and JavaScript Library.

Next, we expanded the presence in the web and mobile dimensions by releasing DYMO Label Web SDK, DYMO Label Mobile SDK for iOS, and DYMO Label Mobile SDK for Android. Although SDKs are still officially in the beta stage, we know they were successfully used, e.g. MailChimp used it on iPad for visitor management, and Google itself used it on Android during developers conferences.

Because of Firefox’s new release schedule and changes into internal architecture we did one, two, three, four, five updates to the Firefox extension, and another one is coming soon. Again, a note of caution: the extension is obsolete, for new projects use DYMO Label JavaScript library.

To support Mac OS X 10.7 Lion, we released DYMO Label software 8.3.1 and did some internal fixes to JavaScript library.

Finally, DYMO Label SDK for Windows was released with updated samples and documentation.

On the sad note, after dozen years with DYMO, I am leaving the company and this is my last post.

Anyway, Happy Holidays! Happy New Year! Let new year be better, brighter, more peaceful than 2011. May the Force be with you. Live long and prosper. Bye.

Sample, Samples, Samples!!!

$
0
0

Hi everyone,

Over the years, there has been a lot of confusion regarding our SDK samples. In the past, to get our samples, you needed to download an “SDK Installer” from www.dymo.com. The “SDK Installer” name was a bit misleading as the installer only contained samples, no binaries. As you know, all the binaries required for our SDKs are installed as part of DLS. So in order to clear things up, we’ve consolidated all of our samples into one ZIP file. This ZIP file contains the following:

  • DYMO Framework Samples for C# and C++
  • DYMO SDK High-Level COM Samples for C++, C#, VB, and ASP.NET
  • DYMO SDK Low-Level COM Samples for C++
  • Documentation for both the DYMO Framework & DYMO SDK

This ZIP file can be downloaded here: SDKSamples.zip. Please note that all of the samples in the ZIP file are intended for use in Visual Studio 2015 and using .NET 4.5.1 where applicable.

We also have a number of JavaScript samples that can be explored. While we do not provide the source for these samples directly, you are free to use the dev tools within your favorite web browser to check out the source code for these samples.

  • Print Me That Label – a simple JavaScript sampled that can be used to check if DLS is installed properly and the JS SDK is functioning correctly
  • Preview and Print Label – see a preview of a label in the browser and print the label
  • Print 2 Labels – example of multiple label printing
  • QR Code – barcode printing example
  • Spreadsheet – example of printing multiple labels from an online data source

Furthermore, we have a a diagnostic sample that can be used to ensure your dev/client environment is setup correctly.

  • Check Environment – runs a quick check of your setup and brings to your attention any potential problems

Happy coding!

How to solve problems with missing DYMOPrinting.dll

$
0
0

We have been receiving a lot of support inquiries with regards to a missing DYMOPrinting.dll file.  If you have this problem, the simplest solution is to copy the DYMOPrinting.dll file from your installation folder to the folder where your application is executing.


The new DLS 8.6.1 release is now available!

$
0
0

The latest release of DLS is now available for customers that have been experiencing issues with the previous 8.6 release.

Issues fixed in 8.6.1 include:

  • Print Quality issues with a variety of consumables, including File Folder
  • Ability to not install the Web Service and other installer fixes
  • Various SDK fixes (DLLPrinting.dll, RenderLabel requests failing, threading issues, etc.)
  • Various bug fixes

Please use the below links to download the DLS installer.

Mac OS Download link Mac DLS 8.6.1

Windows Download link Win DLS 8.6.1

Google Chrome “not secure warning” fix is on the way!

$
0
0

It has come to our attention that Google Chrome is flagging calls to the DYMO Web Service as “not secure.”  This has been causing many of our users to have issues when printing through Chrome.

We have found the issue and have an internal fix undergoing QA testing at this very moment.  We estimate the fix will be released within 2 to 3 weeks. We apologize for the inconvenience at hope this will be resolved soon.

In the meantime, please consider several temporary fixes that have been identified within the below blog post:

The new DLS 8.6.1 release is now available!

New DLS 8 released! (This fixes security certificate issue for Windows)

New DLS update released! (This fixes issues on Mac OS X)

ERR_SSL_VERSION_INTERFERENCE in Chrome 63 using the JS SDK

$
0
0

Hello everyone,

Chrome recently released an update to Chrome (version 63) that includes experimental support for TLS 1.3. Unfortunately, this is causing problems with our client-side web service that powers the JavaScript SDK. We are currently looking into this issue but in the meantime, there is a workaround available. The following steps need to be performed on affected versions of Chrome:

  1. In the Chrome URL bar, enter chrome://flags and hit Enter
    chrome_flags_url
  2. Once on the chrome://flags page, find the setting for TLS 1.3
    chroms_tls13
  3. Change this setting to Disabled
    chrome_tls13_disable
  4. Relaunch Chrome
    chrome_relaunch

Once Chrome restarts, you should no longer receive the ERR_SSL_VERSION_INTERFERENCE error. We will update this post as we continue to research this issue.

Viewing all 23 articles
Browse latest View live